The Data
First, let's get our Cribl Stream instance properly configured to receive data.
Set Up a Default Destination
The Cribl Stream instance to the right of this instruction panel is a "clean install," identical to what you'd install from cribl.io's Download page, or via cribl.cloud
And, as with all new Cribl Stream instances, it is a best practice to make sure you have a default Destination set up before configuring any Sources. (Without a Destination, you could encounter blocked data and other errors.) Let's verify this:
- In Stream's top nav at right, select the
Datasubmenu and clickDestinations. - On the resulting
Manage Destinationspage, click theDefaulttile. - We won't change any defaults here, but your Stream interface should now look like the screenshot below (click to enlarge). Note that the
Defaultis preset to a Destination nameddevnull:
In Stream's left navigation, you should see a green dot next to the Default Destination. That is an indication that the Destination is functional.
With this devnull Destination set as the default, your Cribl Stream instance is now configured to simply drop data. Obviously, as you begin to work with your Stream instance, you'll add other "real" Destinations. Stream supports a wide variety of Destinations, both streaming (like Elastic) and non-streaming (like S3).
Set Up a Datagen Source
Cribl Stream accepts more than a dozen source protocols. Cribl Stream also has a built-in datagen to make it easy for you to design the right routes and protocols for your use case. Let's set up a datagen now.
- Select the
Datasubmenu, and clickSources. - On the resulting
Manage Sourcespage, locate and click theDatagentile.
You can use the search box to find it. - Click the
Add Sourcebutton in the upper right. This opens aDatagen > Add Sourcemodal. - In the
Input IDfield, typeapache_common. - In the
Datagentable, underData Generator File, chooseapache_common.logfrom the drop-down. Your interface should now look like this (click to enlarge):
- Click
Save.
With the steps above, you enabled the apache_common.log datagen. Now, apache_common-style logs are flowing through your Cribl instance as if they were coming from a legitimate Source. You'll verify this next.
Capture a Sample
Finally, we will capture a sample of this streaming data to use as we develop our lookup configuration.
- Select the
Processingsubmenu and clickPipelines. - Click
Capture Datain the right pane. - Paste the following into the
Filter Expressionfield, replacing the defaulttrueentry:__inputId=='datagen:apache_common' - Click
Capture...and then clickStart. - After events are captured, your interface should look something like this (click to enlarge):
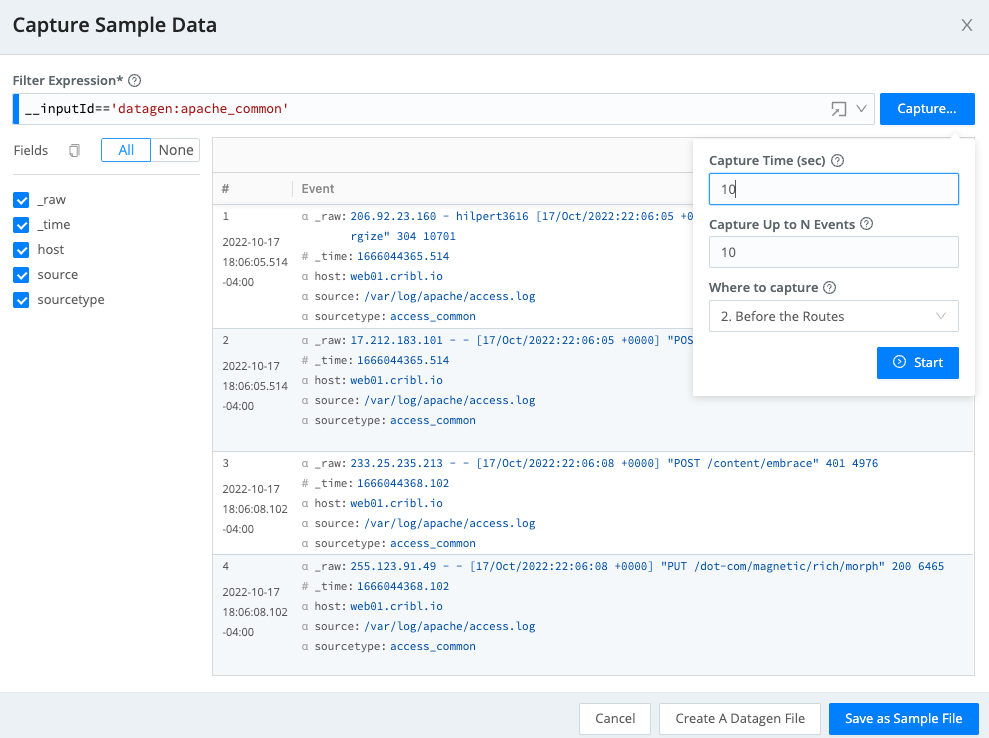
- Click
Save as Sample File. - In the
File Namefield, replace the default entry withapache_common.log. - Click
Saveto close the modal. The events captured in yourapache_common.logfile should now be displayed in Stream's rightPreview Simplepane.
Let's unpack that Filter Expression entry: To spare our customers from having to learn a new, custom query language, Cribl Stream adopted JavaScript. The expression you used above (__inputId=='datagen:apache_common') is an example of this. The field __inputId is an internal variable representing a Stream Source, and datagen:apache_common is the full name of the newly configured Source from which we wanted to capture events.
Now that we have a sample of data to work with, we are ready to start playing!