Discovering Data using HTTP Responses
In this module, we'll configure Cribl Stream to discover data using HTTP requests' JSON Response body. Common response formats include objects and arrays. Let's explore both.
HTTP Request – Object Response
In this section, we'll obtain a JSON object from a REST API endpoint that will be used for collecting data from the collection endpoint similar to how the JSON Response configuration worked in the last module.
We can pass any attribute from the discovered object to the collector, but in this example we'll continue to use id.
This is the discovery object we'll be using to collect data:
{
  "id": 1
}
You can see the expected discovery output by running the following command in your Sandbox terminal window:
curl -s http://rest-server/discover/object | jq
Navigate back to the REST Collector Source page. From the top nav of your Cribl Stream Sandbox, select Manage > Data > Sources, then select Collectors > REST from the Data Sources page's tiles. Click Add Collector to open the REST > Add Collector modal, which provides the following options and fields.
-
In the Collector ID field, enter
discover_http_object. -
Expand the Discover accordion header, then from the Discover Type drop-down, select HTTP Request.
-
In the Discover URL field, enter the following URL:
'http://rest-server/discover/object' -
In the Collect section, configure the Collect URL to reference the
idvalue at the end of the URL path.`http://rest-server/collect/object/${id}` -
At the bottom left, click ► Save & Run. In the Run configuration modal, click Run again.
The Preview modal should display a single event:({"item":1}).
HTTP Request – Array Response
Now, we'll configure the Collector to discover data obtained from a JSON array from the REST API server.
[
  {"id": 1},
  {"id": 2},
  {"id": 3}
]
You can see the expected discovery output by running the following command in your Sandbox terminal window:
curl -s http://rest-server/discover/array | jq
If you want to adjust with the array's length, add a query string parameter size to the request. E.g.:
curl 'http://rest-server/discover/array?size=5'
Depending on the length you specified, you'll receive a response similar to the following:
[{"id":1},{"id":2},{"id":3},{"id":4},{"id":5}]
In some terminals, you'll need to enclose the URL in quotes, otherwise you'll receive a "no matches found" error.
To proceed, close the Preview modal (if open). Navigate back to the REST Collector Source page. From the top nav of your Cribl Stream Sandbox, select Manage > Data > Sources, then select Collectors > REST from the Data Sources page's tiles. Click Add Collector to open the REST > Add Collector modal, which provides the following options and fields.
-
In the Collector ID field, enter
discover_http_array. -
Expand the Discover accordion header, then in the Discover Type drop-down, select HTTP Request.
-
Copy and paste the following JSON into the Discover URL field:
`http://rest-server/discover/array` -
Optionally, you can adjust the size of the discovered array of items. To do so, under the Discover parameters header, click + Add parameter. Enter
sizefor the Name of the key-value pair. In the Value field, enter the desired size of the array. -
Now, in the Collect section, configure the Collect URL to reference the
idvalue in the URL path.
`http://rest-server/collect/object/${id}`
- At the bottom left, click ► Save & Run. In the Run configuration modal, click Run again.
The Preview modal should display three events. If you configured a different size parameter, the number of events will match the size of your array.
Don't be surprised if the events are not sorted in numerical ascending order. The Workers might pick up tasks out of order. Remember, Workers place discovered tasks into a collection queue, and can then process them in any order.
Exploring Collection Job Results
Close the Preview modal and navigate to the Sources > REST Collector page. (From the top nav of your Cribl Stream Sandbox, select Manage > Data > Sources, then from the Data Sources page's tiles or left nav, select Collectors > REST.)
In the Manage Rest Collectors table, go to the discover_http_array row. In the Latest Ad Hoc Run column, click the corresponding blue link for the collector.
Note: If you receive a "Failed to find job" error, or the Latest Ad Hoc Run column lists None, re-run the collection job. Click the ► Run button and, in the Run configuration modal, click Run again. Close the Preview modal once it finishes populating.
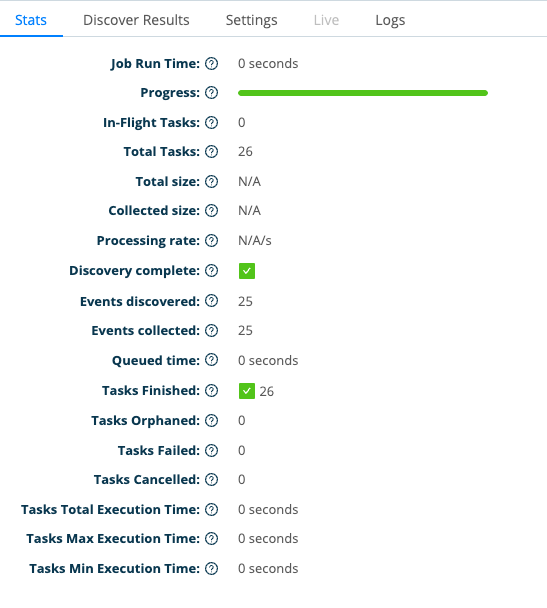
You can see in this modal information related to the collection job such as the number of tasks run, events discovered and collected. Click on any of the other tabs to see information related to discovery, task log messages, and settings.

Conclusion
You now know how to discover data from a REST API endpoint, and how to use the results to collect data!
In the next module, we'll explore how to handle collecting data from REST APIs that use pagination.