It's not immediately obvious that as cool as Cribl REST Collectors are, they don't run independently or automatically. The vast majority of telemetry that is processed by Cribl is push-based. It arrives at the Cribl receiver either because the source itself is sending it (such as the case with Syslog, NetFlow, some forms of OpenTelemetry, etc) or because an agent has been configured to send data to Cribl (as in the case of multiple vendor agents).
REST, on the other hand, is pull-based. The data is only generated and presented when something asks for it (which is the entire point of a GET request).
Therefore, in order to keep that sweet, sweet API data flowing, you'll need to tell Cribl when to go out and ask for it.
That's what scheduling is all about, and what we're going to cover in this module.
Let's get the easy part out of the way
Throughout this lesson, we've repeatedly said:
"At the bottom left, click ► Save & Run."
But not once did we mention the other button that's RIGHT THERE: "Schedule". So let's check that out now.
If necessary, navigate to the REST Collector Source page. From the top nav of your Cribl Stream Sandbox, select Manage > Data > Sources, then select Collectors > REST from the Data Sources page's tiles or left nav.
-
Click Add Collector to open the REST > Add Collector modal.
-
In the Collector ID field, enter
schedule. -
Copy/paste the following URL into the Collect URL field.
'https://dummyjson.com/test' -
At the bottom left, click... NO NOT ► Save & Run! Instead, click Schedule.
This pops up the "Schedule Collector" modal. Cribl's REST Collector uses Cron expressions which are, to be honest, not something everyone has memorized. A nice tutorial on Cron expressions can be found here: https://en.wikipedia.org/wiki/Cron.
But for our purposes here's what you need to know:
- each place represents a specific time element (seconds, minutes, days, etc) in this order
<seconds> <minutes> <hours> <day-of-month> <month> <day-of-week> <year>is the most complete listing- most systems (including Cribl) use 5 positions:
<minutes> <hours> <day-of-month> <month> <day-of-week>
- In each position you can put a single number, a range, or a wildcard
- Asterisk ("*") is a wildcard. Any number matches the pattern
30 * * * *would run at x:30 every hour of every day of the month0 6 * * *would run at 6am every day
- A comma (,) lets you put multiple values in the same position
0 8,12,18 * * * *runs at 8am, 12pm, and 6pm every day.
- A hyphen (-) sets a range.
0 9-17 * * * 1-5runs at the top of each hour between 9am and 5pm, but only runs Monday - Friday.
- A slash (a forward slash, if you're pedantic - "/") indicates an interval. As in run every /x times.
*/10 * * * *runs every 10 minutes.5/15 * * * *runs every 15 minutes, but starts at 5 minutes after the start of the hour. So at x:05, x:20, x:35, and x:50.
- Asterisk ("*") is a wildcard. Any number matches the pattern
Back to Cribl's schedule modal, there are a bunch of options. I could write them all out here, but honestly it would be doing our amazing docs team a disservice since they already did a better job at it than I ever could. So if you have questions, take a minute for a little RTFM (read the FRIENDLY manual): https://docs.cribl.io/stream/collectors-schedule-run/
Why Disable Skippable, and Enable Resume Missed Runs?
These settings are important for reliable data collection with any Collector!
Cribl Stream places concurrency limits on its number of running jobs and tasks. This is to ensure that system resources are not depleted during runtime. When Sources like Office 365, and Collectors like S3 run concurrent jobs, they can exceed concurrency limits – and Cribl Stream might then skip a REST Collector job. With Skippable disabled, if Cribl Stream reaches concurrency limits, it will queue the job run until the next available start time.
The Resume missed runs setting is important when the Leader Node restarts or is unavailable. If you enable this setting, Cribl Stream tracks the last successful run time for each job. Upon restart, it will automatically schedule any skipped collection jobs.
Read more about Job Limits on the Cribl Docs site.
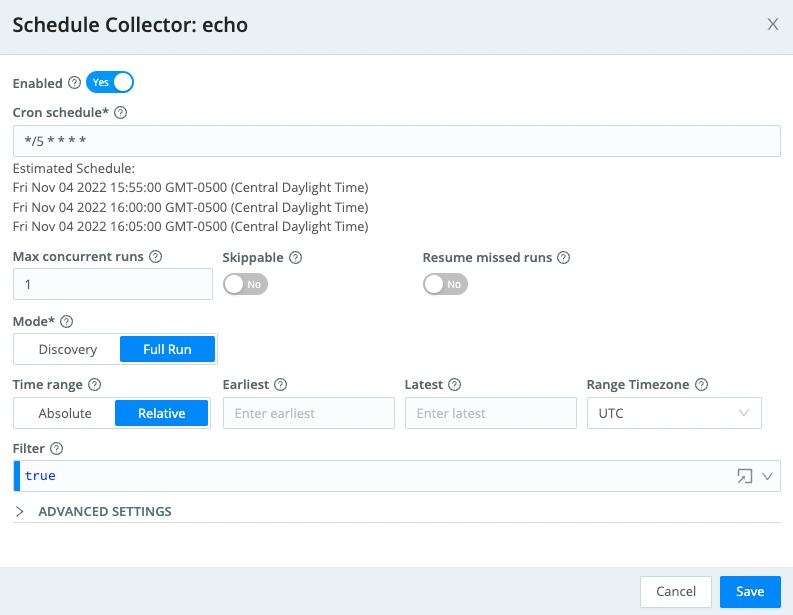
Now, let's configure the schedule job to run on a schedule. The goal is to collect a 60-second snapshot of data every 60 seconds.
- Change the Cron schedule to
* * * * *(meaning every minute). - Set Skippable to No.
- Set Resume missed runs to Yes. (This setting appears after you disable Skippable.)
- In the Earliest field, enter
-1m@m. This means Cribl Stream will snap to :00 seconds, 1 minutes ago. - In the Latest field, enter
@m. This means Cribl Stream will snap to the last minute at :00 seconds. - Click the Save button.
Your Schedule Collector window should look like the following:
This is ANOTHER case where you must next Commit and Deploy for your changes to take effect. So do that now. Or else this example is NOT going to play nice for you.
Conclusion
Congratulations, you now know how to schedule collection jobs! In the next module, we'll explore how to troubleshoot – using logs – when a REST collector is not working correctly.