
Find & Replace
In addition to simply routing data, Cribl Stream can perform many different types of transformations on the data. There are many use cases, including: Securing the data's contents, by removing or encrypting sensitive information. Reducing cost, by eliminating unwanted fields in even nested data structures. Or aggregating data, to convert many different events to a much smaller stream of metric data.
In this section, we will use a Mask Function to do an md5 hash of a sensitive piece of information in our data. We will use Data Routes, such that only data sent to tcpjson will be modified, and the original data sent to fs will remain unmodified.
Adding a Pipeline
First, we need to add a new Pipeline. Since our sourcetype is business_event, let's name our Pipeline the same, so we'll know what type of data it was designed to work with.
important
Add a Pipeline
- Select the
Processingsubmenu and clickPipelines. - Click
+ Pipeline, then clickCreate Pipeline. - In
ID, enterbusiness_event. - Click
Save.
You'll now see an empty Pipeline with no Functions. Before adding Functions, let's grab a capture to get some sample events to work with.
important
Save a Capture
- In the right pane, make sure
Sample Datahas focus. - Then click
Capture New. - In
Filter Expression, paste the following to replace the default entry:sourcetype=='business_event'sourcetypewhose value isbusiness_event. (You might recognize this field name from Splunk's schema.) - Click
Captureand thenStart. - When the capture has completed, click on
Save as Sample File, bringing up the sample file settings dialog. - In that dialog, set
File Nametobe.log. - At the bottom right, click
Save.
Mask Function
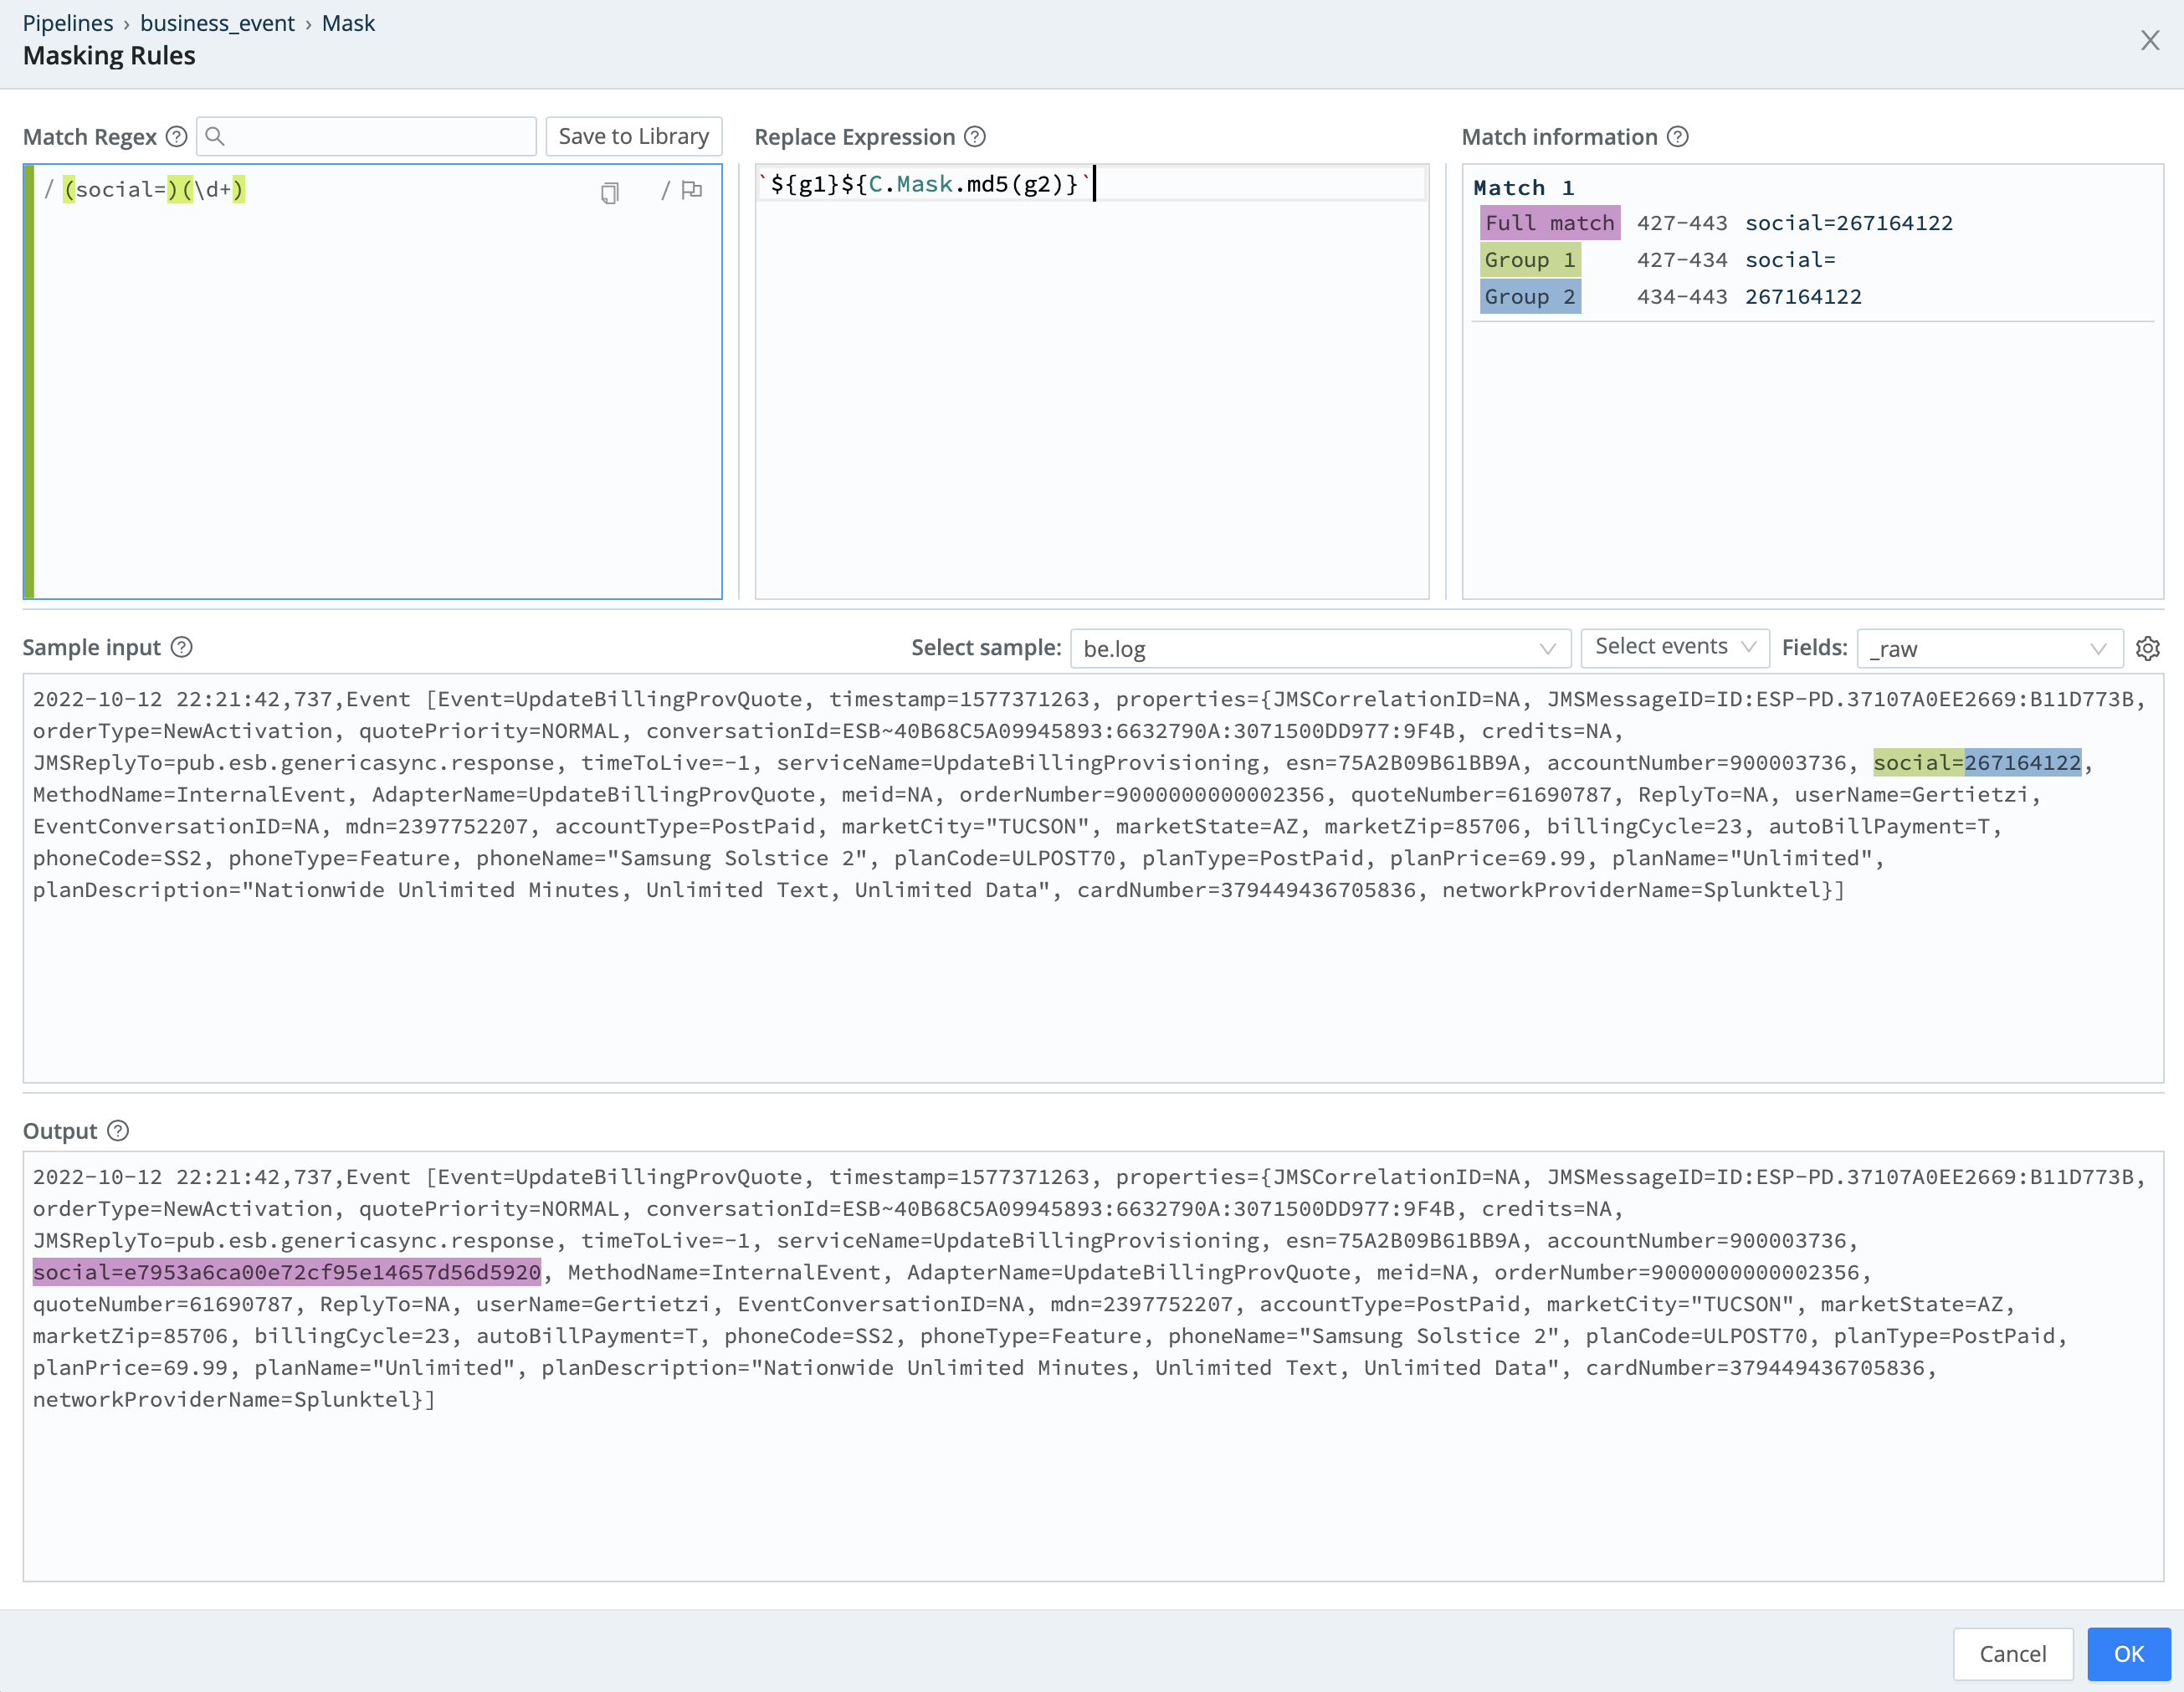
If we look at the data in the right pane, we can see that the _raw field contains a number of Key=Value pairs. (Click the Show more links to expand the full _raw fields.) Look carefully, and you'll see pairs of the form social=123456789, which contain unredacted social security numbers. We're going to use our Mask Function to run an md5 hash of these numbers and then replace the original value with the hashed value.
important
Add a Mask Function
- On the left
Processing > Pipelinespage, click+ Function. - Search for
Mask. - Click
Mask. - Replace the default
Filtervalue with:sourcetype=='business_event' - Click the Expand icon (
Advanced Mode) at the right edge of theFilterfield. - In the resulting
Filtermodal'sOutputfield, verify that your expression evaluates totrue. - In the
Filterfield, remove thetfrom the end of'business_event'. - Verify that the
Outputfield now evaluates the expression asfalse. - Put the
tback. - Click
OKto close theFiltermodal. - In the
Masking Rulestable's first row, click the pencil (Edit) icon to the right of theReplace Expressioncolumn. This opens theMasking Rulesmodal.
It's a good practice to scope every Function's Filter expression to just the data you want the Function to operate on. This way, if data accidentally gets sent down the Pipeline, each Function will work only on data it's expecting to work on. In general, defense against misconfiguration is best done in depth.
Now, let's compose our match regular expression and replacement expression. Our Masking Rules editor makes it easy for you to do this interactively, against real data, to gain confidence that your Match Regex and Replace Expression are going to work properly with your data.
important
Add Your Regex
- Paste the following into the dialog's upper-left
Match Regexfield, between the two/delimiters.(social=)(\d+)
This is a simple regular expression that looks for digits following social=. After pasting this in, you'll notice that we find where the regular expression matches in the main event body, and we highlight both matching capturing groups in the Match Regex field.
(Explaining regular expressions is outside the scope of this tutorial, but there are numerous resources online for learning regex. Regular expressions can be a very valuable tool in the toolchest of a machine data engineer.)
Replacement Expression
note
Input Replacement Expression
This section is teaching about typeahead and the expression editor. We recommend that you follow along interactively, but if you're in a hurry, you can skip the rest of this section by copying and pasting the following into the upper-middle Replace Expression box in the Mask Editor.
`${g1}${C.Mask.md5(g2)}`
Next, we want to create a replacement expression. Replacement expressions are also JavaScript expressions, like those you've already seen several times in this tutorial. The replacement expression can be any type of JavaScript expression, but we also make the regex capture groups available as variables in the replacement expression.
important
Type ` (backtick), which the IDE will automatically expand as two backticks.
You're now entering a JavaScript Template Literal, which is a little templating language built into JavaScript. The syntax for referencing variables is very bash-like, and from the above expression, you can see a couple of variables.
important
Type ${g1}.
In the bottom portion of the Mask editor, notice how social= appears where social=123456789 was in the original event. We now have a JavaScript template literal which is taking the value from the first capture group – which you can see at the upper right is matched as social= – and placing it back.
Next, we're going to call a helper Function to modify the value of capture group 2.
important
Add ${C.Mask.} and stop.
As you type, you'll see that the UI gives you typeahead suggestions to help you complete the expression. In this case, you can see there are a number of Masking Functions available to you. You're free to experiment with other options, but in this case, I chose md5.
important
Add md5(g2)
The full second part of the expression is ${C.Mask.md5(g2)}. This is using an md5 hashing Function on the value of capture group 2 (g2), which obfuscates this Social Security number for us.
Save the Pipeline
Now, validate in the bottom section that the Mask Function is properly hashing the Social Security number. Your editor should look like this:
Once you're satisfied, save the Pipeline, and we'll look at our data in Preview.
important
Save the Pipeline
- Click
OKto close theMasking Ruleseditor modal. - The regex we just validated should now be in the Function's
Match Regexfield. If not, paste it in:(social=)(\d+) - Click
Saveto save theMaskFunction to your Pipeline.
Now, in the right Preview pane, you should see the modified events. Orange fields represent a field that has been modified by this Pipeline. This preview is being generated offline, using our static sample file. We are not yet modifying production events, as our terminal window should show below.
Installing Our Pipeline
Now, it's time to take our configured Pipeline and start sending events through it.
important
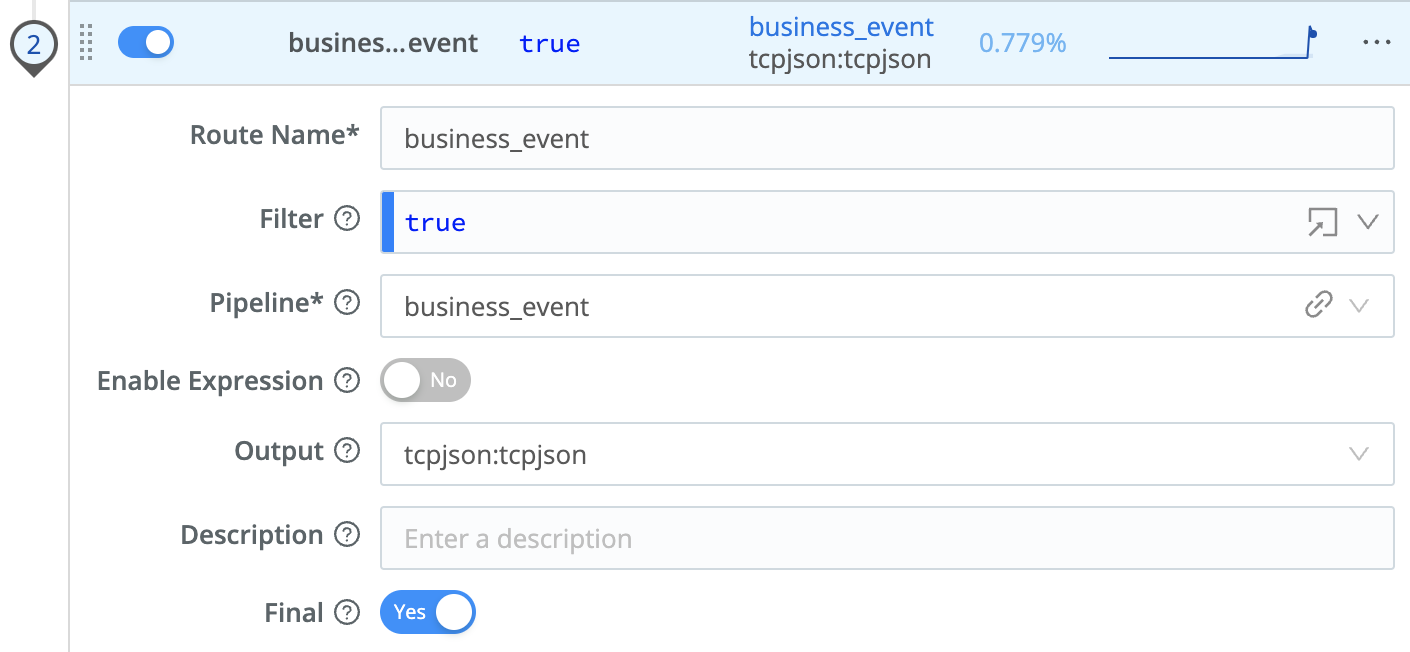
Add Route
- Select the
Routingsubmenu and click onData Routes. - At the
defaultRoute's right side, click the...menu. - From the menu, click
Insert Route Above. - In the new Route's (#2)
Route Namefield, enterbusiness_event. - In
Filter, replacetruewith:sourcetype=='business_event' - In the
Pipelinedrop-down, selectbusiness_event. - In the
Outputdrop-down, selecttcpjson:tcpjson. - Click
Save.
Your new business_event Route should look like this:
In the terminal, you should now see events coming through tcpjson, with the social field hashed. With our current setup, unmodified events are being sent to the fs Destination, perhaps as an archive of the original data. You can validate this with the following two commands. The first shows new data being appended to the filesystem; the second shows modified data coming out through tcpjson.
note
Look at Data in Terminal
Optionally, validate that data is correctly shaped in the terminal.
- In the terminal, run
tailon thefsoutput to verifysocialis unmodified here:tail -qf /tmp/staging/*/*/*/*/CriblOut*.json.tmp | grep -E 'social=|' --color=always - Type
^Cor (Ctrl-C) to restore a command prompt. - Validate that
socialis modified ontcpjson:tail -f /tmp/nc.log | grep -E 'social=|' --color=always
Next, we're going to use Stream to parse our input, lifting the nested Key=Value structure to the top level of the event. This will allow the data to be more easily consumed in other systems.